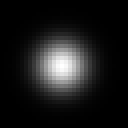
Here's a simple way you can visualise the shape of any convolution filter, such as a blur or defocus. Easy in Fusion, but the same approach works with most image processing apps.
- In a new comp, start with a black background, about 64 x 64 is fine, and make it float32.
- Add a single white pixel in the middle of it (I used Paint with the pixel brush).
- Now add a tool that does filtering, such as Blur.
- Normalise the image (in Fusion you can use the AutoGain tool, or just click the Show Normalised Image button on the image view toolbar, at the right).
 You might want to zoom in a little, and probably increase the size of the Blur (200 is good), so you can see what's going on. You should see something like this:
So that's what a Gaussian kernel looks like, nice and smooth. Try turning HiQ on and off, and see how it changes. With HiQ off, it's not quite as smooth (but it's faster).
Now try setting the Blur to Multibox instead, and try different Num Passes settings (hover to see which is which):
You'll note that Passes = 1 is identical to Box, and Passes = 2 is identical to Bartlett. Beyond 3 or 4, the difference gets hard to pick.
But the fun doesn't end there! Instead of Blur, try a Defocus tool (turn off blooming by setting the Threshold to 1.0). Gaussian mode is similar to the Gaussian blur, but if you switch to Lens mode, you can clearly see what the NGon and Circle kernels look like:
Of course, filtering is done by other tools too. An obvious choice is the Filter tool - take a look at the Emboss, Sobel and Defocus filters. Or even a Transform (turn the Size up to 5 or so, and make sure HiQ is on):
In particular, note the darkened "lobes" on Catmull-Rom, Mitchell, Lanczos, Sinc and Bessel - these provide a sharpening effect. It's also interesting to try different windows on the Sinc and Bessel filters, to get an idea of their effect.
Looking for more? Try this same technique in other image processing apps, to see what their filters really look like.


The Gaussian kernel (blur tool in general) seems to generate some kind of strange 2D patterns when working with alpha (Gaussian looks like 2D Sinc). Set your background to alpha 0 in your example above, add a Boolean tool and "divide" all RGBA channels by alpha to visualise this).
ReplyDeleteFloating point rounding can produce some very small inaccuracies, far below the limits of human perception, so that some pixels are almost-zero instead of zero (both colour and alpha, in your example).
ReplyDeleteWhen you divide by anything non-zero by itself, you get one; otherwise you get zero, and you end up with an interesting black & white image showing the subtle rounding patterns of our gaussian approximation (you'll note they change when enabling HiQ).
Well you are right the pixel values are around 10^-6 and less and change with HiQ on/off. Another interesting thing is the new alpha. It gets the shape of the DoD... well just have to watch what operation I make in float. Thank you!
ReplyDelete